


现在的很多 FRP 教程还停留在旧版本,导致新手按照教程操作经常报错。本文基于最新的 Frp v0.52.3-v0.65.0(TOML格式),手把手教你实现内网 Web 服务的 HTTP/HTTPS 穿透,并演示如何优雅地配置多域名访问。
1. 架构思路
我们的目标是将公网 VPS 的流量转发到内网的 Web 服务器(如 Nginx、群晖 NAS 或 IoT 设备):
HTTP: 用户访问 http://域名:8080 -> VPS -> 内网 80 端口。
HTTPS: 用户访问 https://域名:8443 -> VPS -> 内网 443 端口(采用透传模式,证书在内网管理)。
如果 VPS 上的 80 和 443 端口未被占用(如未安装 Nginx/Apache),你可以直接将下面的端口改为 80 和 443,这样访问时就不需要带端口号。
记得在 VPS 的防火墙(或阿里云/腾讯云安全组)中放行上述所有端口(7000, 7500, 8080,8443)。
2. 服务端配置 (frps.toml)
在 VPS 上创建或修改 frps.toml:
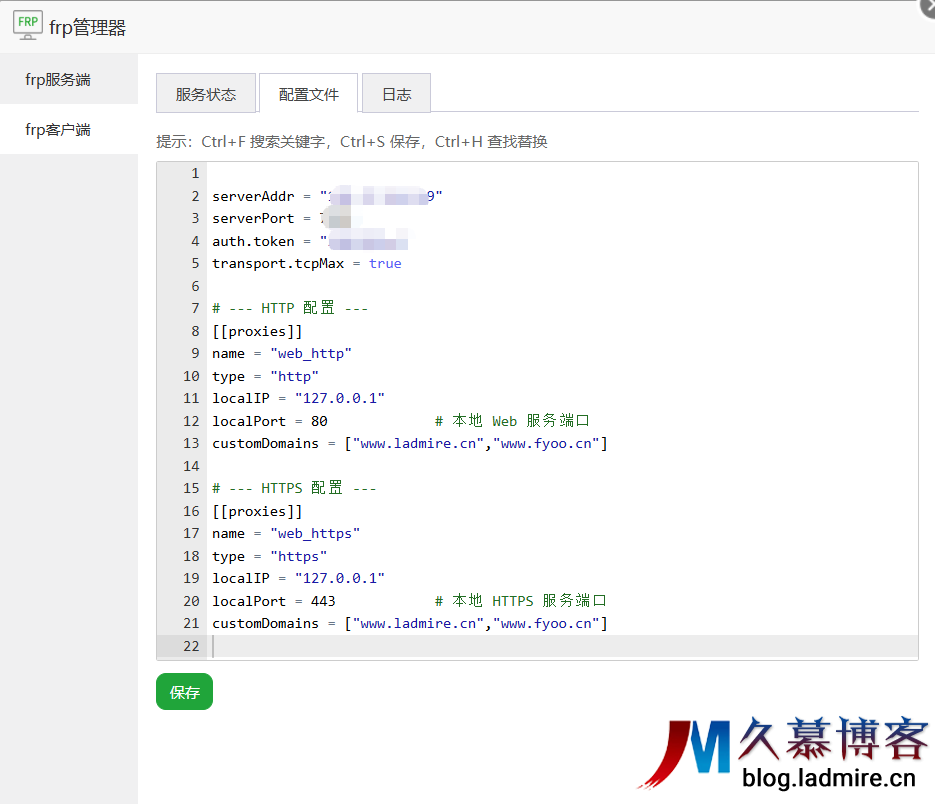
bindPort = 7000
vhostHTTPPort = 8080   # HTTP 访问入口
vhostHTTPSPort = 8443  # HTTPS 访问入口

# 身份验证
auth.method = "token"
auth.token = "StrongPassword123"

# 控制台 (可选)
webServer.port = 7500
webServer.user = "admin"
webServer.password = "admin"
3. 客户端配置 (frpc.toml)
这是本文的重点,我们在内网机器上配置 frpc.toml。这里演示核心功能:同时穿透 HTTP 和 HTTPS,并支持多域名。
serverAddr = "x.x.x.x"  # 你的 VPS IP
serverPort = 7000
auth.method = "token"
auth.token = "StrongPassword123"

# --- 场景1:普通 HTTP 网站 ---
[[proxies]]
name = "my_blog_http"
type = "http"
localIP = "127.0.0.1"
localPort = 80
customDomains = ["blog.example.com"]

# --- 场景2:HTTPS 透传 (推荐) ---
# 流量不解密直接传给内网 Nginx,证书配置在内网
[[proxies]]
name = "my_blog_https"
type = "https"
localIP = "127.0.0.1"
localPort = 443
customDomains = ["blog.example.com"]

# --- 场景3:多域名指向不同服务 ---
# 比如这里指向内网的 NAS
[[proxies]]
name = "my_nas"
type = "https"
localIP = "192.168.1.10" # 指向局域网其他IP也可以
localPort = 5001
customDomains = ["nas.example.com"]
以宝塔frp管理器为例
安装完后配置文件按照以上修改
4. 进阶技巧:多域名配置详解
在 v0.52+ 的 TOML 格式中,多域名配置非常灵活:
A. 单服务多域名
如果你希望 www.test.com 和 API.test.com 访问同一个内网服务,可以直接写在列表里:
customDomains = ["www.test.com","api.test.com"]
#  或者域名泛解析
customDomains = ["*.example.com"]
B. 多服务多域名
如果你有博客、NAS、HomeAssistant 多个服务,只需复制多份 [[proxies]] 块,确保 name 字段不重复,并填写对应的 localPort 和 customDomains 即可。
5. 特别提示:HTTPS 证书去哪了?
注意: 在 HTTPS 透传模式下,Frp 只是搬运工,不处理证书。你需要确保内网的 Web 服务器(Nginx/Apache)已经配置好了对应域名的 SSL 证书。Frp 将加密流量原封不动地交给内网 Nginx,由内网 Nginx 进行解密和响应。
Q: 为什么启动报错 unknown field?A: 恭喜你,你正在用 v0.52+ 的程序读取旧版配置。请参考我的上一篇文章,将配置转换为 TOML 格式。

")


还没有评论,来说两句吧...